Tuesday, December 29, 2015

Step-By-Step

Our children very thoughtfully hosted Christmas; therefore we have not lost momentum on the remodel. Now that the project is ours we accomplish what we can each day and no more. The last thing Corey did was install cabinets, so our "galley" has finally returned.

Old houses are not entirely square, so there is a shim here and there.
We are eager to add floor, tile back splash, and appliances. But first the counter top people must do their work.
The reality is we move ahead step-by-step and will probably be at it for two or three more months. Currently Don is laying the sub-floor in the main floor bath room and preparing the door to that room. He has "re-purposed" the door that before joined the little diagonal hallway and the front entry. With the new floor plan it is no longer needed.

Sami painted her "Eldon" desk four and a half years ago (see entry May 26, 2011). One of her first remodel projects. Finally, the last touch has been added; the cushions!

Since we will continue to use our basement kitchen for several more months, Sami covered the temporary counters, which were beginning to suffer from all of the use, with some bright oil cloth that was a Christmas gift from Claudia.

Sami can remember when it was standard practice to cover rental house counters with oil cloth

Friday, December 18, 2015

On the First Day...

Christmas may be only seven days away, but our big countdown started last Wednesday when the cabinets were delivered, a total of 22 big boxes. Corey was here yesterday to lay out lines for positioning the cabinets on the kitchen walls using his laser leveling system.  He's back today to finish unpacking and finish the lines on the walls.  Don is helping with the two-person stuff. 


Sami has painted the kitchen walls "Lapland," a soft olive green in preparation. Corey and an associate will install the cabinets over the weekend, and Corey will return next week to work on the two custom cabinets that will be inserted into the walls


The quarter-sawen oak looks and smells lovely. Pretty nice Christmas gift!

This cabinet will go over the range hood


Friday, December 4, 2015

None of the Above


Don searched everywhere for the old window trim that he had stored when he installed the new windows five years ago, but could not find the trim for the upstairs front windows. So he bought new material and built new trim and sills. Of course he spotted the old trim right after he had finished building the new - leaning against his work bench!

Way back in 2011, at the beginning of the project, we put new windows in the study and tried to figure out what color we wanted the paint that room. We sampled several greens and yellow-golds on the wall, but didn't really like any of them (see entry 5/5/2011). Now, five years later, we have decided to go in a different direction and chose a gentle, warm-gray called "gray owl." What made us decide on gray is the fact that we love the gray in the bathroom and wanted to continue the theme throughout the upstairs.


Our plan is to paint all the rooms in the house and we have come up with a color scheme that flows from room to room. The salesman at the Benjamen Moore paint store is getting to be a close acquaintance!

Sami put in an 8 hour day painting the study. Its about half done.

Thursday, November 19, 2015

First Finished Surface


About two weeks ago a silence descended upon our house; one we had not heard for several months. All of the contractors left along with their drilling and sawing and banging. The silence signaled a dramatic change, at least for a while. The project is now OURS. Time for a whole bunch of sweat equity.


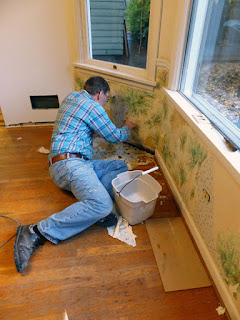
Don has been diligently working on the surfaces in the bathroom and polishing up the uneven spots with mud, putty knives, and primer. 

We haven't seen the green wallpaper for about 25 years.

 We have made many trips to the paint store and we have two finished surfaces to show for all of the work. The front door is finished, inside and out and the dining room ceiling and upper trim is done.

Our worn, old front door looks much better.
Painting the inside brightens up the entryway.
Ceiling and molding are done!

Other elements of the remodel are moving forward too. the cabinets are in a queue to be built and should arrive the middle of December. We had to revisit the back splash tile design about four times, as the space for it morphed more than once, because drawings we were working with did not reflect the realities of our range, hood and cabinets. We’re excited about the final product. It is full of lovely fruits, vegetables and little animals; including a snail and a mouse. Eeek! We have selected products for the kitchen counters and floor as well as the bathroom floor.

We have selected a manufactured quartz for the counter tops and a vinyl tile for the floor.


Sunday, November 1, 2015

Our Turn


The flurry of activity last week made very visible progress. With the sheet rock all in place, the space is defined. The new under-layment for the floor in the kitchen means that room is sealed off. We can no longer see into the basement through the knotholes and gaps in the floor, nor can we see into the main floor bedroom and bath areas from the kitchen through the skeleton of naked framing.

Mid-way through matching the ceiling texture
Its a match!

The final step in the sheet rock job was to match the texture on the walls and ceiling from the old areas to the new. The dust from all of that work has settled (a LOT of dust!), and we find ourselves in the middle of a project that we now largely own. We have about six, or so, weeks to wait until the kitchen cabinets are ready to install. In that time we hope to do many of things that are on our sweat equity list. First we must spend a few days delivering our house from all of the white dust and grit left from the sheet rock work. After that, our list is long. Don has begun by refinishing the front door, giving the new walls a coat of primer, and repairing the several areas of the floor that have been damaged over the years or by the remodel. Sami has spent the last few days musing about colors to use throughout the house. The Benjamin Moore Web site has proved to be a very useful tool to visualize color combinations, and Powell’s Paint Center, just a few blocks away, has supplied many paint chip samples. The names given to the colors are as fun as the colors; “Lapland,” “Rustic Brick,” “Gentle Cream,” “Brittany Blue,” “Snowfall White.”

Some colors we are considering together with the kitchen tile and cabinet oak.

For the first time in quite a few months we can pull our cars into our driveway free and clear. Gone are the contractors cars and their port-a-potty, and gone is the old dishwasher. That was taken by the appliance store when the delivered our new refrigerator and dishwasher. The new is finally replacing the old. There is still lots of work ahead of us, but things are beginning to take shape.


Friday, October 23, 2015

A ‘MUDDY’ MESS, but lots of progress!


In two weeks a lot has happened. At last elements are being added that bring the project closer to their end result. Final tweaks to the plumbing and electrical systems were made before the sheetrock would seal those systems into the walls. Before sheetrocking, both Don and Corey spent hours adding shims to wall studs, to make the walls ‘flat’ and to compensate for the difference between the thickness of the sheet rock and the old lath and plaster. This will allow for better cabinet installation, and make the door and window trim be flush to the walls. Interestingly, some of the shimming was done with cardboard strips made for the purpose; others were cut from scraps of wood.

Next, Corey installed insulation in the exterior walls. Don added more insulation around the sewer pipe next to the peninsula, to quiet the flushing sounds in the sewer pipe that runs next to the seating area.

Don is always busy after the crews leave.
Insulation in the exterior kitchen wall

Next, the sheetrock crew took over. First piles of materials and equipment were delivered. Then, the sheetrock was installed by the ‘hanger’ team of two men. Amazingly they did it all in one day; kitchen, part of dining room and entry hall, closet in bedroom, and the full new main floor bath! The next day a new worker came and cleaned up the area. Later another two man team came and did the initial taping and ‘mudding.’ When they left we set up fans to help dry the ‘mud.’ They skipped a day to let the mud fully dry, and then came back again and did a second pass. More fans running day and night to let it all dry.

They will be back another day to do the final sanding – uggh, the DUSTiest part of this project!. Yet another worker will be here later to texture the patched areas in the dining room ceiling, and some wall areas needing matching texture to the old plaster walls. The kitchen and bathroom, since they are all new sheet rock, will not be textured.

The complexity of the electrical and plumbing, some of which took lots of effort to work out, and which occupied us for weeks is now hidden behind the walls. We have taken lots of photos, so if walls are ever opened up again, there will be no surprises. Now all we see are switches and outlets. Here are some pictures of that work.

Materials delivered, ready to start hangin'
Sheetrock hung
Here’s the peninsula area and the hall to the front door.  You can see signs of the funny old angled hall.
View from the kitchen to the garage
The new closet in the main floor bedroom. We think this is the way it was when the house was built.
Back wall of bathroom; sink and medicine cabinet on right, and shelves above the toilet on the left.
Right wall of bath—shelves to be, and shower.

Another significant thing was getting our heating system back on line. It’s been getting pretty cool at night. The furnace was shut down and the thermostat removed when the initial demolition was done, as the thermostat was in a wall that went away. Don was able to fish the thermostat wires through an old wall and installed the thermostat along the side of the stairs. This was a chance to test out the new duct work that feeds heat upstairs, as the old duct went away with the same wall that had the thermostat. The new duct took some trickery to snake around both in the basement ceiling, and in the wall and ceiling of the new kitchen peninsula area. Here are some pictures of this work
 
Here’s the ducting that was done in the basement ceiling.
We are lucky its been a warm fall. Finally the thermostat is in its new home.

Susan, the cabinet person, came along with Corey, to take final ‘field’ measurements for the cabinets, and to discuss details, to get the cabinet order rolling. This is the biggest expenditure of the project next to the labor (think 5-digit $$), so attention to detail is warranted here. Don returned to Pacific Cabinetry (in Vancouver) yesterday, to work out some details on the two custom cabinets they will build (for the old pantry cupboard, and for the old phone nook). We will presumably meet with Susan early next week to officially place the order and pay a deposit

Mud, mud, everywhere. Next, a clean-up and then the underlayment for the floor. Hopefully that will be an end to this very messy phase.

Whew!  Guess that’s enough to report on for now.

Sunday, October 11, 2015

TIMELINE


The most frequent question we get about the remodel is, “when do you anticipate being all done?” Sami always answers that question by saying, “I am not the engineer on this train. Rather I am sitting back in the club car sipping on a martini. I’ll be glad when we pull into the station, but otherwise I am content.”

Continuing the train analogy, Don is definitely the assistant fireman, shoveling coal as fast as he can. He is also in the roundhouse office making sure all the details are identified and that they all fit together correctly. To be honest Sami often comes out of the club car to help shovel and make decisions. From time to time she is able to entice Don back to relax and share a sip or two.

To get a better handle on how long this journey will last, today we sat down with to-do lists and calendars and did our best to estimate the timeline for the rest of the project. The short version is that we are probably about half way through. We have been at it for about five months and it will continue for about five more.

At the half-way point all of the "guts" are in place. Ready for surfaces.

A more detailed version of the timeline goes like this...

October & November
Sheet rocking, measuring for cabinets, oak floor mending, refinish and install trim, build bathroom and kitchen shelves, under-layment for the kitchen floort, waiting for cabinets (estimated time before delivery after measuring is 6-8 weeks), main floor bathroom (floors, fixtures, lighting, finish work), main floor bedroom (completed except floor refinishing).
Before mid-December
The cabinets will be delivered, and installed.
December & January
Kitchen and entryway floor, counter-tops and construction of the little peninsula, kitchen tile work and painting. Install range, refrigerator, dishwasher and hood.
February and March
Most of the finishing details will be done by us, plus we intend to finish the upstairs work on our bedroom and study, plus the stairwell and hallway. At the very end of the project we will move back into our kitchen/dining room. Then Don will rebuild the wall in the basement and Sami can finish painting down there and spiff up the basement bathroom. Last but not least we plan to have the back deck floor replaced.

Then comes a GREAT BIG PARTY!!

Friday, October 2, 2015

Men... er ... People in Tool Belts

All work on the house stopped for a week because of vacations, both Corey's (our contractor) and ours'. Last week work resumed as Corey finished the exterior of the kitchen window and Don fixed and painted the garage door and window trim at the front and back of the house. For that last few days there has been a flurry of activity as plumbers, h-vac workers and electricians have drilled, pounded, sawed and created lots more wood chips and dust. Corey was joined by lots of men in tool belts; Darrell, Dan, Malcolm, Charlie and Casey.


This morning Sam, an apprentice electrician joined the crew.

Sam (Samantha)... finally a little gender equality!

The suspended ceiling in the basement has simplified a lot of the work. Its nice to know that after all of the duct work, plumbing and electrical work is done, in a day or two, it will begin to go back together.

Sunday, August 30, 2015

More Progress!


One of the biggest challenges of the remodel has been figuring out how to do the required ceiling beam in the dining room, because the sewer pipe was where the beam and a support post needed to be. The solution was eight fittings that snaked around the post, and a special offset steel beam. The pipe snakes around the post on the side away from the dining room so that ‘hiding’ it is less of a problem (will probably lower the ceiling over the peninsula area, rather than in the dining room). The vertical pipe by the post was also changed from plastic to cast iron, to reduce the noise of flushing water, as it will be very close to people sitting at the new peninsula, and cast iron pipe is much quieter. Some sort of insulation will go around the plastic fittings at the top. All structural work is now done, and a structural inspection is scheduled for Monday.


This is our new crank-out casement window that will be in front of the kitchen sink. It’s hard to tell, because of the tar paper sticking out on all sides, but the window is pushed out from the wall a little. The spaces (boxed in areas) on both sides was the trick used to enable moving the window toward the dining room and not have to figure out how to patch the steel siding. The pushed out boxed area around the window will have Hardie Board siding that matches in appearance. Our architect came up with the idea.


Here’s the inside view of the new kitchen window and its related framing.


Our builder patched the kitchen floor where we discovered the wood was burned and weak. In the past a small fire happened below the floor, probably caused by plumbing work - using a torch to solder copper pipes to the water heater. It is not clear if it went out on its own or if someone discovered it and put it out, but the wood was left charred and burned.


The temporary walls are finally gone, so we now get a feel of the open space. The first picture is looking toward the living room; the second toward the garage (hint...you can see where the funny little angled hall was).


We are off through the plastic portal to the rest of the house. Good night!

Wednesday, August 26, 2015

Steel Beam


The project continues to be on schedule. Today Corry and two helpers threaded a steel bean into place across the new opening between the kitchen and dining room, where part of a load-bearing wall was removed. Now the temporary joists can be removed and the newly configured areas will begin to take their final shape. This beam corresponds with the new steel bean in the basement ceiling. Each piece serves to maintain the integrity and strength of the entire structure. In fact, they are supposed to help our house stay standing should there be an earthquake, or at least this area will remain intact.

Friday, August 7, 2015

Puzzle Pieces


Although we have been home owners for 40 years, we have never “decorated” a room until we undertook this project. We have chosen paint and floor coverings occasionally, and an individual piece of furniture once in a while. Together we have designed and built decks and bay windows, but when it comes to planning a space starting with a blank sheet of paper, we are novices. No wonder people use decorators! But we are getting a lot of satisfaction from putting all of the pieces of the puzzle together. Right, wrong or indifferent... the design will be OURS.

We visited our cabinet maker yesterday and defined most of the  details of what will probably be the biggest-ticket item for the project. Don loves quarter-sawn white oak. We decided on a simple Shaker-style. All of the new inside-the-cupboard options look very functional, and a far cry from the carpenter built-in-place drawers and shelves we had before, that were simply boxes sliding on wood.
When our old kitchen cupboards were removed we found this, the signature of the original cabinet builder, complete with the number and insignia of his union. Signed exactly 67 years ago today.
The first idea we had for kitchen tile and colors incountered a major snag when the artist began a cancer treatment which would take her away from work for weeks, perhaps months, so we turned for inspiration for the kitchen colors from a local tile maker, Pratt and Larson. Sami, with some input from Don, has designed a tile focal point for behind the range, using multi-colored bas-relief tiles featuring garden and animal themes. Earth colors from these tiles will be used throughout the kitchen.
Top right, white oak sample. The tiles are part of Pratt and Larson's "Watercolor" line.
This concept drawing does not show the depth and range of colors, or the background color, which would be the lightest tile in the photo above.
For the new main-floor bathroom Sami is envisioning a color pallet drawn from Simon our cat, creamy browns, grays with turquoise blue touches, although this is still “on the drawing board.” We do have a concrete plan for the all of the elements of that room including fixtures and their placement. This will help Corey in his framing effort in the next several days.
Should we use the beautiful blue of Simon's eyes as an accent color, or perhaps bring the rusty red in from the kitchen decor? Decisions, decisions.
We feel like many of the puzzle pieces are moving into place! Don had his fifth bone marrow biopsy today. The results will determine what his next stage of treatment will be. We’re hoping that the treatment will be moderate, and Don will be able to do all he has signed up for (all wood trim, kitchen and bath flooring, patching the oak flooring in the dining room and entry way, installing bathroom fixtures and all light fixtures, and a couple of specialty wood working projects). Whew!  All for now.

Thursday, August 6, 2015

LOTS ACCOMPLISHED!


Since our last blog entry, we were able to complete the ‘sweat equity’ part of demolition and prep for our builder, Corey, before leaving on an 8-day trip (Sami’s 50th high school reunion and a stay at the Library Cottage in Manzanita). The ‘sweat equity’ work included completely stripping the kitchen and main floor bathroom of all cabinets, cupboards, appliances, sinks, toilet, and ceramic wall and floor tile, as well as selling, donating, or disposing of those things. It also included completely emptying Don’s Man-Cave (basement office) and removing the wall separating it from the rest of the basement, to enable footing and column work for a needed support beam. It should be noted that Carl and Angie helped demo the kitchen (a Father’s Day present).

Before departing on our trip, we boarded Simon and Daphne at the "Kitty Condos."  We endured a loud symphony of complaints on the drive there. We tried to tell them they would be better off at the condos than in a house with concrete sawing and jack hammer work.

While we were on our trip, Corey began the serious demolition work and put in the footing for the support column in the basement. He dutifully sent us several pictures at the end of each work day, so we could monitor the progress.  It was a little daunting to leave, knowing what was going to happen to our home. It helped to know that Corey was running the show—much better than someone doing this who we didn’t know or have confidence in. Here are a couple of his in-process pictures...

This is the hole cut in the basement floor where Don’s office wall was removed, for the footing for support columns to support a beam that will allow part of the load-bearing wall shared by the kitchen and dining room to go away.

The work area (kitchen, dining room, main floor bedroom) is sealed off with zippered plastic doors, to contain the dust and debris of the demo work.


Sometimes we would have to study Corey’s pictures a little, to understand what part of the house we were looking at.  Not to worry...

We returned from our trip late Friday, August 31st. We found that we had to think ahead about how to get to different parts of the house. The next morning we mastered how to handle showering, breakfast, etc., by going from the top floor down to the living room, outside the back living room door, around to the back door to the basement, and then inside to go downstairs to the basement for coffee and breakfast. Then we retrieved the cats from the Kitty Condos, and endured another LOUD symphony of complaints during the ride home. They have finally settled in and have conditionally forgiven us for their unfortunate incarceration.

Here are photos taken of progress since our return.


All wall and ceiling surfaces are now removed, exposing lots of wires and plumbing.  What may not be obvious are the two temporary walls on either side of the load-bearing wall that has been removed.  The temporary walls hold up the ceiling and the upstairs until the load beam for the ceiling is installed.

The ceiling has been removed in the kitchen.

Every project has one BIG challenge.  For this project, it is the sewer stack pipe, shown below.  It is causing problems far out of proportion to it’s innocent look.  The challenge is to reroute it so that the required ceiling beam on the main floor can be properly placed, and also not alter where we want the wall opened up.  Dan the plumber will show up on Tuesday and hopefully perform miracles.

 
The pictures below show the load beam installed in the basement ceiling, in Don’s office.  This beam supports the columns for the load beam that will be installed in the dining room ceiling.  To avoid having to put a column in the middle of the basement shower (meaning remodeling yet another bath room), and having a beam hang below the ceiling in Don’s office, a fabricated cantilevered steel beam was installed (cantilevered meaning one side extends beyond it’s column (over the top of the shower stall).


Here’s the new shower for the main floor bathroom.  It’s in three pieces, as there’s no way to get a one-piece stall in to the house.

We have made a lot of headway in a bunch of other areas too, but we'll save that for the next blog entry.