Friday, December 2, 2011

Don’t read the text


Our collection of interior decorating and how-to magazines and books grows and grows.  We both pore over them to get inspiration and guidance. However, the text below every picture analyzes the colors, patterns, products as though there is a right way and a wrong way to reach a pleasing end. It makes it sound very tricky to get things right. That makes us feel less than confidant about our choices.

So, we have decided to simply not read the text that analyzes the style of anything. Rather, we look and the pictures and decide for our selves; Do we like it? What do we like about it? Why do we like it? It seems to help us decide what colors, products and styles we want and understand why. Often it may be just that we like this or that and if one has a whole room of those things, it is fine with us. What could be better than being surrounded by things you love?

That’s why we will keep much our old stuff and that is why our rooms will never make it into House Beautiful!

Tuesday, November 29, 2011

All Master Bath surfaces ready for finishing!


Well, maybe not the biggest news to post, but all surfaces (sheetrock and tile backer) for the upstairs bathroom walls and floor are now done, ready for the next step of taping and filling to their finished state. Almost all surfaces are new. The ceiling (except over the tub) and small portions of two walls are original. The toilet flange was marginal for height (had considered adding a 1/4-in backer board layer on top of the 1/2-in already installed). I did a test install, to see if that was needed, and it wasn't, which saved some work. Our new Toto toilet uses an unusual (to me at least) way of mounting. It uses an 'adapter' that mounts to the floor and the floor flange, and then the toilet mounts to that. My test install was installing the adapter, to make sure it would seat on the floor (layed loose tile down) and seal properly with a wax ring. Oh, my, the details!


Don


Friday, November 25, 2011

Coming Together


Don has been putting in full days on the bathroom and things are finally coming together. For the last week he has been installing sheet rock, green board and making a new set of shelves cut into the wall. He has also been making the cupboard that was already there deeper. The cupboard was built before towels were as big and fluffy as they are today. It’s a lot of work for an extra couple of inches!

Almost done with tile backer and sheet rock

Don's do-it-your-self shelf extender system

Sami has had her mind deep into a project totally unrelated to the remodel - writing a history of the Library Cottage.  Once in a while she gets to help lift something heavy or hold on to something while Don gets a screw started. Sami’s feeling a little guilty, but then seldom does an interesting project like the history come along.

Sami did lay out all of the decorative tile on the living room floor the other day to make a plan about which tile goes were. She hasn’t been a total slackard. (Guess who wrote this one)

Sunday, October 23, 2011

Back At It - Slowly


There were lots of interruptions in the remodel this summer. We spent much of August and some of September at our “other house,” Spindrift (the Library Cottage). We worked while we were there. Sami served as the general contractor and Don repaired old, worn out bits and pieces. Sami also got a good start on writing the history of the Cottage.. fantastically fascinating.

Refinishing the front screen door at Spindrift

When we were home the garden demanded all of Sami’s attention, canning tomatoes, beans and ketchup and pulling three million weeds!

Now we are slowing moving back into our own remodel. Don systematically finished the installation of the first twelve windows.

Lots of steps
Don is sitting on his home-made window installation seat

All of the fixtures and tile for the upstairs bathroom are finally on hand, so we are moving ahead to put that room back together.

Tiles and fabric awaiting installation

Dare we say that the bathroom will be finished by Christmas. We hope so!

Monday, September 5, 2011

New bath tub installed!

Don here... This is almost old news now, as the new Kohler cast iron bath tub and Toto tub/shower valves and controls were installed almost two weeks ago, but we've 'been on the road'. As promised, I / we decided to leave this part of the work to the professionals.

The new tub and plumbing were installed by Crouchley Plumbing (recommended by someone in Sami's book group, and I give Crouchley a 'thumbs up'). It took three of them to get the tub up the stairs (on an appliance-type hand cart), but only two to move it in to the bath room and position (I helped a little). I had layed plywood on the oak floors down and upstairs for protection. It took the rest of the day for two of them to hook up the drain and faucet plumbing, partially because of doing it so that we can later modify it where it goes through the wall below, when we get to the kitchen remodel phase. They ended up pumbing the cold and hot supply all the way to the basement (easy because of the suspended ceiling down there), but we cut a number of other access holes where needed in the main floor wall where the plumbing is.

No progress has been made since getting it installed, as we have been full-tilt on our other 'remodeling' project...the library cottage in Manzanita. It is being re-sided and we are spending a good part of three weeks over there during that project, to monitor the work and to get other significant projects done while the place is renter-free. I'm back in Portland for several days (work, guitar lesson, Oliver-sitting), but return for the weekend (to bring Sami back to Portland and to tweak a couple of projects I worked on there. We then return to Manzanita one more week later for an extended weekend. Whew!

Well, here are several pics of this latest step in our master bath. By the way, all the major special items (fixtures, accessories, lighting, tile, etc.) are now all on hand, so we should be able to rev up when we get back from the beach cottage.

We've gone 'PEX'.


'The foot in the kitchen ceiling' (below the upstairs bathroom).


One of the two plumbers hard at work.


The job is done!!


Just so no one thinks we are using being at the coast as an excuse to be lax on our remodeling project, here's a couple of pics of what developed as the siding guys started to reshingle the front porch of the cottage. A lot of rot and improper prior framing and flashing resulted in the porch floor being at the end of its life. We studied the findings and developed a game plan with the workers for reframing the floor. We aren't doing the work over there, but we are actively involved with the process. Sometimes it a bit of a nail-biter, as both cost and timing are critical.


Cheers!

Sunday, August 14, 2011

The Beginning of the Beginning


Don has completely demoed the upstairs bathroom, including digging out the rotted wood in the subfloor and replacing it. It is all ready to be put back together.

Six years ago we fell in love with some ceramic tile that we found in a little store in Seattle imported from Tonala, Mexico. We bought eight tiles, figuring they could some how be used in our remodel. As it turned out, our entire bathroom design has revolved around those eight tiles. It has not been easy because they are not a standard size or thickness. We visited many, many tile shops and web sites to find other tiles that compliment the bird tiles and fit our budget. Plus, our plan now calls for twenty more bird tiles. So this Tuesday I will take the train up to Seattle to pick out the additional tiles while Don stays home accepting delivery of our new tub, sink and toilet. I guess you could say we are finally at the start of putting something back together! The beginning of the beginning.

water-damaged and rotted wood replaced

Don with his "multi-function tool," Sami wields a hammer

 The fabric on the left in this picture, will be framed and hung on the bathroom wall. It is a piece of embroidered Chinese silk, which we think it is pretty with the fanciful bird and nature motif of the Mexican tile.

China and Mexico

Wednesday, August 3, 2011

The Command Center

Our refrigerator door serves as the Scripter Remodel Command Center. Right now it includes sketches we have made of our upstairs bathroom design (yea - we finally have one!), an insulation upgrade diagram, and an upstairs floor plan showing what walls will be removed to add wiring and insulation. There is a detailed step-by-step to-do list for the bathroom, and a more general to-do list for the entire upstairs. These help us to not forget some vital step in the remodel process, and they help us remember decisions made. There is a floor plan of the main floor remodel, to help us remember our ultimate goal, and a table Don made about the window installation, to help him keep track of all of the steps he goes through to permanently install each window. Many hours and a lot of thinking has gone into creating those little lists and diagrams.

About once a week we get out a yellow marker and mark off things that have been accomplished. It is easy to think about the huge list of things left to be done and ignore what we have accomplished. Seeing all the little yellow marks makes us realize that progress is being made.

Do real contractors have a refrigerator door?

Wednesday, July 27, 2011

Why cats don't like remodeling


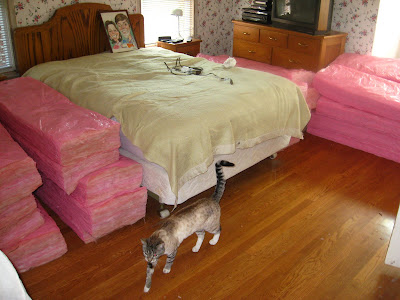
Don again. OK...this is a little out of date, but here is a picture of Simon (the cat) being somewhat perturbed about the attic insulating part of our remodel that, from his point of view, is invading HIS space.


Going, going, gone...

Don here...reporting on the demise of our venerable but quite ugly old cast-iron bath tub. After we decided to replace rather than refinish the old tub, we pondered options for getting the old tub out of the bathroom, and decided to use the 'brute force' approach--a big sledge hammer and wearing lots of safety gear. By the way, there are lots of YouTube videos of tubs being broken up. I'll let the pictures speak for themselves.


Wednesday, July 20, 2011

Visible Progress


So much we do is not visible, such as research, planning, and shopping. But this week we have made some progress that can be seen. We have removed everything in the upstairs bathroom down to the studs and the rough floor. Only our old cast iron bathtub is left. Don has outfitting himself with ear, eye and face protection in order to go after that with a sledge hammer.

Thursday, July 7, 2011

The Journey

In terms of our remodel, we have decided that it is about the journey, and not the destination. Well, okay it is the destination too. But since we are doing much of the work ourselves, it had better be about the journey, because will we be walking down this path for a long, long time. And so far we have been enjoying the journey. It keeps us thinking and learning a lot; about color, about the geometry of ceramic tiles, about materials properties. Don has learned how to work one-handed lying on his stomach in a very tight place (when he hooked up the bathroom ventilation fan in a tight spot under the roof). Okay, okay, maybe that wasn’t quite so much fun. But, it is nice to know we can still do it!

Thursday, June 9, 2011

Work hard, play hard

Don is climbing up and down a ladder, through a little crawl space into the attic, adding a walk-way (actually a crawl-way) and R-30 insulation above the blown-in insulation that is already there. That will bring our insulation up to the recommended amount.

It's hot up here!
Filling up paint cans with old paint

I am removing several layers of paint from the interior window trim that Don removed as he installed our new windows. What a time-consuming gunky mess! But the pay-off in pretty wood is a nice reward.

Often, like yesterday evening, we can’t muster enough energy to work, so we go out to eat, listen to good music, and share a glass of wine.
Tony Starlight's Supper
This is what happens next.....

Nap time

Tuesday, May 31, 2011

Polka Dots


Time for a quick entry from Don. I spent yesterday checking our upstairs for existing insulation, to help decide what upgrades to do. I had previously made some test holes behind trim molding at the floor, but needed to check the rest of the walls and sloping ceilings. I ended up drilling a number of 3/4-in diameter holes in enough places to convince myself of the presence (or lack of) insulation. Our upstairs now is polka dotted! The picture doesn't do a very good job of showing it, but you get the idea. This is our bedroom west dormer, but I did all the walls and sloping ceilings upstairs. By the way, that is one of the new vinyl windows.


FWIW, the 3/4-in test hole decision was based on the size of wine corks (to plug the test holes for final spackling). Only the better quality wines have corks that are up to this task (darn--guess we better sip that wine!). Also, we purchased an LCD inspection camera (3 foot flexible probe) from Harbor Freight for about $100, which was used to see behind some of the walls, to help in the analysis (also good for DIY colonoscopies?) We did find everything from no insulation to a variety of blown-in insulation to rock wool batts, to fiberglass batts. The resolution is that about half of the various insulated wall / sloping ceiling areas are OK, and we will open the walls and add or replace insulation for the balance. This also allows for some basic electrical upgrades (mainly grounding everything, and also adding wiring for a couple of portable air conditioners).


We will add insulation on top of the existing ceiling insulation, and will do that right away (before it gets hot). I have to vacate my closet to do that, as the access hatch is there, and is a tight squeeze. Wheeee...what fun!


Thursday, May 26, 2011

Little, bitty baby steps

How are you coming on you remodel? We get asked that question daily. The answer is -  we are immersed in details.

Don has all of the new windows in place, temporarily. Don will make shims, to center them exactly in the openings and we will refinish both inside and outside trim before they get installed permanently. But we can already tell that we are very happy with our choice. They look good and operate slick. No more rattling windows when the wind blows! Best of all they will require no maintenance.

Right now, Don is doing reconnaissance to develop our upstairs insulation and wiring plan. He is cutting holes in various places in the upstairs walls to determine were and what kind of insulation is needed. The answer is not simple. So far he has found that some places are insulated with the “wool” we found in the wall behind my desk, some have no insulation, and some areas have a 3-inch batting-style insulation. We don’t want to take out walls needlessly, but we do want to upgrade the insulation to maximum performance, where reasonably possible. All of this is compounded by the fact that we plan to up-grade wiring, an easier job if walls are out of the way, but not worth removing and replacing walls just for the wirings' sake.

I have spent days painting my little wooden desk (the “Eldon” desk). It will be red, the contrasting color we hope to use here and there throughout the house. Boy, that desk has a lot of surfaces! Each one must be sanded, primed, sanded again, and then given two coats of red. I got as far as the red on the stool and then decided that the color was not quite right. I’ll be at it for days and days more!

"Raspberry Truffle" or "Claiente"?
The other question we are often asked is – “when will you be finished?” The answer is - not in the foreseeable future!

Wednesday, May 11, 2011

Windows Update - Not the Computer Operating System


We are ready for the new vinyl single-hung windows, which arrive on Monday. Several hundred pounds of cast-iron counter weights have been removed from the existing windows, as well as the pulleys. The weights could have been left in the wall, but recycling seems to make sense. The biggest challenge was getting the old upper sashes removed, as they were both painted and nailed in place. The inside trim is often left in place in such work, but I removed it for two reasons: to enable making the trim to fit the new windows better, as some of the old windows were significantly racked (probably installed that way originally), and we will remove interior wall surfaces where insulation upgrades and minor electrical upgrades are needed. Determining the presence and quality of existing insulation without undue demolition will take some thinking.


The windows were the first major decision about 'product' for the remodel that we have made. In making that decision, we pondered our overall philosophies regarding the remodel. We more or less agree on the following...

We generally don't plan to go 'bottom of the line' or 'top of the line', on the premise that we want something 'good' and we want something that is a 'good value'. We do go on the premise that this remodel will be the only one that we will do, and we want it to last as long as we remain in the house (they may haul us out of the house eventually in pine boxes). We may go to the high end on a few things that are really important to us, but don't feel that we can or should do that as a general thing. We also want to be 'green' as feasible. I'm also voting for choices that reduce maintenance when it doesn't otherwise compromise what we want.


Stay tuned....film at eleven.


Thursday, May 5, 2011

Window Finesse


After reading all about windows and shopping around, we picked out our windows; Milgard "Tuscany." They are vinyl, which made me suck in my breath (think: "manufactured home"). But they are considered very good, low maintenance, and will have the highest rating, energy-wise. Anyway, all of the lovely old wood trim will go back up. We will use wood clad ones in the main part of the house.

Right now, Don is removing eleven windows, the first batch to be replaced. He takes off all of the trim – gently, gently! Also the cords, weights, and stop strips. Then he puts the windows back in a temporary mode, so our house isn't open to the elements while we wait for the new windows. Thus far, my part of the job has been to loosen painted-closed pieces and to pull nails out of the trim that we will use again (the trim, not the nails). I didn't know that there was so much finesse needed to pull out finish nails. They must be carefully pulled out from the back side, using pliers and a piece of wood as leverage. That way, no blemish is made on the front side and no wood putty is needed when the trim is refinished. There are a lot of details to this remodel thing.

Good-bye double hung windows (sniff!)

Sunday, April 24, 2011

Nail Number ONE!

Finally!

Can you believe it, we pulled the first nail today! Don is measuring windows so we can order the new ones. So, off comes the trim. Let the dust commence!

Tuesday, April 19, 2011

The Garage is Finally Done!!!!


Table saw - before

Stuff - before
East wall - before

After years of having an out-of-control garage, and the occasional temporary 'shove aside' cleanups, the Scripter garage is 'in-depth' clean for the first time ever. This is a significant step in our remodeling process, as it was the last big step before launching into the real remodeling.

Our garage is really a shop / work area, and not a place to park a car, and that was factored in the final garage layout. Even after giving away or tossing LOTS of stuff, things were saved that apply to maintenance, our hobbies, and the remodeling--but now it is organized so that a needed bolt or electrical connector can be found. We may never need to go to the hardware store again! The space still looks pretty drab and uninviting, but I will add paint when I'm tired of doing other things. The concrete floor is slated for replacement down the road also, as it was a poor job when originally done, and the tree roots I dealt with last summer added to the problems.

Here are some before and after pictures of the garage (warning--some images may be objectionable to some viewers).

Cheers! from Don 

You can see the floor! - after

Work bench - after
East wall  & table saw - after


Wednesday, March 16, 2011

The Eldon desk


The “Eldon desk” is a little wooden desk that Don’s dad made for Sami. He had previously made one for each of his grandchildren. Sami really liked the desk’s simplicity so Eldon surprised her with one the next Christmas. The desks were made of scrounged material and Sami’s desk has a piece of wood on the underside that must have come from an old phonograph cabinet. Eldon painted around the 2x2½ inch RCA logo of Nipper the dog listening to “his master’s voice.” Of course the little picture will be preserved.


Saturday, March 12, 2011

The Study

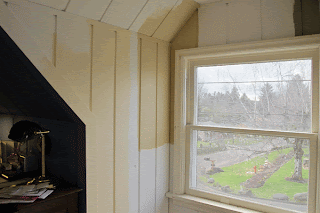
The room we call a “study” is continuing to get its face-lift. Twenty years ago, when we moved here, it was Carl’s bedroom. The walls were paneled in dark wood. After he moved, it acquired a hodge-podge of furniture; a hand-me-down futon from Emily, two file cabinets, two giant wood desks, both discards from our respective work places, two computer desks, cheap bookshelves and, on the walls, a variety of artwork and calendars. Somewhere along the way it got painted a bright blue. A while back, Don switched out his big oak desk for a small roll top desk that had been his father’s. As part of our remodel, to make the room more coordinated, we got Don a new computer desk and both of us new matching bookshelves. We have been wrestling with what color to paint the walls. We want a color that will help bring everything together and create a quite, calm mood. A tall order for a room that still has seven different oak tones (including furniture and floor), five different desks and two different filing cabinets, plus five different electric lights, and two big windows that cast all kinds of light and shadows on the grooved, angled, sloping walls. Oh yes, we want it to coordinate with the other rooms.
Obliterating the blue took two coats of white paint, using a narrow brush (because of the grooves). Here are three Benjamin Moore colors we are considering:
Rich cream – exactly what it sounds like
Amulet – a low-intensity, creamy gold
Dried Basil – a soft, dusty green, tending toward a khaki color


Everyone says the green is best, but my senses respond most positively toward the other two.

Thursday, March 10, 2011

Progress

Slow... but we are making progress. Don spent much of the last five weeks recovering from a nasty flu. That slowed his garage cleaning down to a weak crawl. Instead we have been focused on our study. No actual remodel in there, but we have added a wardrobe, to fill-in for the big closet on the main floor that will be demolished and moved. We added new, bigger bookcases and a new computer desk for Don. All surfaces must now be cleaned and painted. Good-bye blue!

 Everything we do is inspected by Simon. He does not approve of changes in his house. We are thinking of giving him cat Valium to calm him down.

Daphne, on the other hand, is fine as long as the food dish remains full and her basket is kept warm.

Friday, January 21, 2011

Garage loft has been conquered!


With Sami mainly in the driver's seat, the garage loft has been transformed from a to-the-ceiling jig-locked traffic jam to a very tidy open space. The loft had been kind of (for me anyway) the place to toss things if no other logical or handy place existed. With an accumulation approaching 20 years, there was no fast way to deal with it. Sami largely went through it, 'nut and bolt' at a time, organizing and grouping things. As most of it was my stuff, I went through the organized version and did, in fact, finally let go of some things. The end result is shown in the pictures. Too bad we couldn't find the 'before' versions...the transformation would be more dramatic!
Hmmm...I can set up a train table in the northwest corner. By the way, the odd colors on the old dresser are the Southern Pacific RR colors for their old 'Black Widow' paint scheme on their diesels. I also added the hand railings, so that we wouldn't fall through the big hole in the floor where the pull-down ladder is.
I'm trying to duplicate Sami's effort in the main lower garage area. I'll add an entry when it reaches a similar 'show the world' state.
Don

Monday, January 17, 2011

BIG boxes and meatballs


We have been to IKEA both yesterday and today to get stuff needed for the “Plan, Clean, & Prep" phase of the remodel; storage shelves for the garage clean-up, and a wardrobe for the study, where I will relocate all of my hanging clothes that have been in the main floor closet. IKEA is definitely a BIG box store. Everything is packed flat and boxed up. We assemble the stuff at home. Today we had to deal with components of what we were after not being in stock and unsure when/if they would get in stock. Back and forth between two levels of the acres-large store, working with two very helpful employees. It all got worked out. As Don says, we had better get ready for a lot of the same thing during the project. We are tired. We have had our fair share of IKEA Swedish meatballs! They had a promotion on where the cost of your meal was deducted from the purchase of your items if you bill exceeds $100. No problem there.

Friday, January 7, 2011

Lists, and more lists


Christmas happened. Now we are ready to turn our attention more completely to the remodel. We continue to work our way through a forty-seven point to-do list called “Phase One – Plan, Clean, & Prep.”  It includes items such as, “weed all books,” “set up temporary kitchen in the basement,” and “consult with structural engineer.” The list also includes getting rid of furniture we no longer want or need. Does any one want a well-used and much-loved upright piano, or a single bed? Weeding our music collection is a tough one too. We have 78s RPM records, 33 & 1/3 LPs, audio cassettes, and CDs. Now that I play most of my music on my iPod touch sound system or with Pandora, do we need any of it? But we love all of it! Decisions, decisions, decisions!
We are also developing a gargantuan sequential list of all the tasks which make up the actual remodel. Its scary.